树莓派使用记录
系统安装
校验包,解压
sha1sum 2013-09-25-wheezy-raspbian.zip
unzip  2013-09-25-wheezy-raspbian.zip
查看当前哪些设备已经挂载,df -h,插入u盘或sd卡再执行一次
为了防止在写入镜像的时候有其他读取或写入,我们需要卸载设备。两个分区都要卸载。
umount  /dev/sdb1
umount  /dev/sdb2
xz烧录命令(该命令尝试失败)
sudo xz -cd kali-2017.3-rpi3-nexmon.img.xz> /dev/sdb
查看烧录进度sudo pkill -USR1 -n -x xz
img格式镜像烧录命令如下(亲测成功)
sudo dd bs=4M if=2013-09-25-wheezy-raspbian.img of=/dev/sdb
查看烧录进度sudo pkill -USR1 -n -x dd
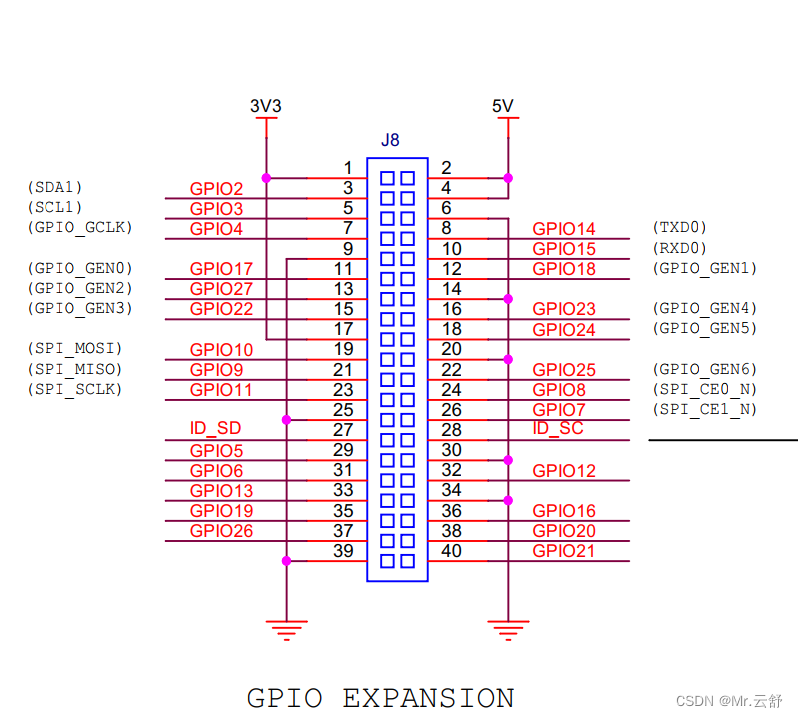
ttl连接
准备一个USB转TTL
修改Sd卡中/boot/config.txt
在最后一行添加enable_uart=1
然后就是连接usb转串口,连接PIN8->RX(USB转TTL),PIN10->TX(USB转TTL),PIN14-GND
连接wifi
## To use this file, you should run command "systemctl disable network-manager" and reboot system. (Do not uncomment this line!) ##

#country=CN
#ctrl_interface=DIR=/var/run/wpa_supplicant GROUP=netdev
#update_config=1


## WIFI 1 (Do not uncomment this line!)

network={
    ssid="coolxiaomi"
    psk="coolxiaomi"
    priority=1
    id_str="wifi-1"
}


## WIFI 2 (Do not uncomment this line!)

network={
    ssid="OpenWrt"
    psk="********"
    priority=2
    id_str="wifi-2"
}
卸载软件
卸载但不删除配置
apt-get remove packagename
卸载并删除配置
apt-get purge packagename
基础命令
安装软件 apt-get install softname1 softname2 softname3……
卸载软件 apt-get remove softname1 softname2 softname3……
卸载并清除配置 apt-get remove –purge softname1
更新软件信息数据库 apt-get update
进行系统升级 apt-get upgrade
搜索软件包 apt-cache search softname1 softname2 softname3……
安装deb软件包 dpkg -i xxx.deb
删除软件包 dpkg -r xxx.deb
连同配置文件一起删除 dpkg -r –purge xxx.deb
查看软件包信息 dpkg -info xxx.deb
查看文件拷贝详情 dpkg -L xxx.deb
查看系统中已安装软件包信息 dpkg -l
重新配置软件包 dpkg-reconfigure xxx
清除所有已删除包的残馀配置文件
dpkg -l |grep ^rc|awk '{print $2}' |sudo xargs dpkg -P
dpkg安裝的可以用apt卸載,反之亦可。
aptitude
aptitude update 更新可用的包列表
aptitude upgrade 升级可用的包
aptitude dist-upgrade 将系统升级到新的发行版
aptitude install pkgname 安装包
aptitude remove pkgname 删除包
aptitude purge pkgname 删除包及其配置文件
aptitude search string 搜索包
aptitude show pkgname 显示包的详细信息
aptitude clean 删除下载的包文件
aptitude autoclean 仅删除过期的包文件
基地64位系统
宝塔虚拟机
启动宝塔虚拟机:
./bt_run
关闭宝塔虚拟机
为了保证虚拟机的数据同步安全,请按照以下步骤操作:
请ssh登录到虚拟机再执行命令 " init 0 " 关闭虚拟机
关闭后,需要在宝塔虚拟机目录下执行 " ./bt_prog " 命令,检查虚拟机是否已关闭
如果没有任何输出结果,代表虚拟机已正常关闭
如果无法正常关闭虚拟机,请在宝塔虚拟机目录下执行 " ./bt_prog kill " 命令
同样记得再次执行 " ./bt_prog " 命令,检查虚拟机是否已关闭 自动启动
启用开机自动启动
./install int
取消开机自动启动
./install uint
默认参数值:
| 项目 | 内容 |
|---|---|
| 默认管理端口 | 28888 |
| 默认Web管理用户及密码 | openfans/openfans |
| 宝塔虚拟机ssh端口 | 2222 |
| 宝塔虚拟机root默认密码 | raspberry |
程序快捷目录位置
/usr/share/applications
vim不能右键粘贴
- 编辑 vim 的默认配置文件
vim /usr/share/vim/vim80/defaults.vim 转至第 70 行,找到:
 if has('mouse')

 set mouse=a

 endif
将
set mouse=a改为:set mouse-=a输入
:wq保存即可生效。
启用CecOS-CaaS容器云
开机自动启动 CecOS CaaS容器云 服务
systemctl enable cecos-caas.service
启动 CecOS CaaS容器云 服务
systemctl start cecos-caas.service
停止 CecOS CaaS容器云 服务
systemctl stop cecos-caas.service
禁止 CecOS CaaS容器云 服务开机启动
systemctl disable cecos-caas.service
桌面版系统单声道改为立体声输出
编辑文件 /usr/share/pulseaudio/alsa-mixer/profile-sets/default.conf
在下面的内容每行最前面添加 ";" 符号,以注释掉以下内容:
[Mapping analog-mono]
device-strings = hw:%f
channel-map = mono
paths-output = analog-output analog-output-lineout analog-output-speaker analog-output-headphones analog-output-headphones-2 analog-output-mono
paths-input = analog-input-front-mic analog-input-rear-mic analog-input-internal-mic analog-input-dock-mic analog-input analog-input-mic analog-input-linein analog-input-aux analog-input-video analog-input-tvtuner analog-input-fm analog-input-mic-line analog-input-headset-mic
priority = 7
下面是注释后的内容:
;[Mapping analog-mono]
;device-strings = hw:%f
;channel-map = mono
;paths-output = analog-output analog-output-lineout analog-output-speaker analog-output-headphones analog-output-headphones-2 analog-output-mono
;paths-input = analog-input-front-mic analog-input-rear-mic analog-input-internal-mic analog-input-dock-mic analog-input analog-input-mic analog-input-linein analog-input-aux analog-input-video analog-input-tvtuner analog-input-fm analog-input-mic-line analog-input-headset-mic
;priority = 7
最后重启系统生效。
安装软件
安装chromium
下载地址
使用sudo dpkg -i *.deb安装,按顺序安装
- chromium-codecs-ffmpeg-extra
- chromium-browser
- chromium-chromedriver
安装smb
sudo apt-get install samba
sudo apt-get install samba-common
smb共享
接下来修改 Samba 的配置文件,打开 /etc/samba/smb.conf ,在末尾添加以下内容:
[share]
 comment = share for raspbian
 # 映射的路径
 path = /mnt/sda1/
 guest ok = no
 read only = no
 browsable = yes
 create mask = 0777
 directory mask = 0777
 valid users = pi,root
smb重启
sudo service smbd restart
挂载硬盘
sudo df -h
sudo mount /dev/sda1 /usr/local/src/share
设置硬盘的开机挂载
sudo vi /etc/fstab
dev/sda1 /mnt/sda1 ext4 defaults,nofail 0 0
mysql安装
安装mysql
 sudo apt install mysql-server
 sudo usermod -d /var/lib/mysql/ mysql
停止、启动命令
 sudo service mysql stop
 sudo service mysql start
连接命令
mysql -u root -p
docker 相关
启用和运行Docker服务
默认没有启用 Docker服务,需要手动启动。
开机自动启动Docker服务
systemctl enable docker.service
启动Docker服务
systemctl start docker.service
停止Docker服务
systemctl stop docker.service
禁止Docker服务开机启动
systemctl disable docker.service
打开树莓派终端,输入下面命令获得超级用户权限
sudo -i
软件安装
jellyfin
如果尚未安装APT的HTTPS传输,请执行以下操作:
sudo apt install apt-transport-https
导入GPG签名密钥(由Jellyfin团队签名):
wget -O - https://repo.jellyfin.org/debian/jellyfin_team.gpg.key | sudo apt-key add -
在以下位置添加存储库配置/etc/apt/sources.list.d/jellyfin.list:
echo "deb [arch=$( dpkg --print-architecture )] https://repo.jellyfin.org/debian $( lsb_release -c -s ) main" | sudo tee /etc/apt/sources.list.d/jellyfin.list
也可以直接编辑 /etc/apt/sources.list.d/jellyfin.list
deb [arch=armhf] https://repo.jellyfin.org/debian buster main
注意:
debian 支持的版本是stretch和buster。具体要根据你树莓派上的版本来设置(通过命令 lsb_release -c -s 查看)。
更新APT存储库:
sudo apt update
安装Jellyfin
sudo apt install jellyfin
使用您选择的工具管理Jellyfin系统服务:
sudo service jellyfin status
sudo /etc/init.d/jellyfin stop
sudo systemctl restart jellyfin
安装Alist
curl -fsSL "https://alist.nn.ci/v3.sh" | bash -s install
qbittorrent
    apt update
    apt install qbittorrent-nox
使用下面的useradd命令来创建我们的新用户。在本指南中,把这个新用户称为qbittorrent。
sudo useradd -r -m qbittorrent
为了确保能够访问新的 “qbittorrent “用户创建的文件,我把 “pi “用户添加到它的组中。将使用usermod命令。在你的Raspberry Pi上运行下面的命令来添加pi用户到qbittorrent组。
sudo usermod -a -G qbittorrent pi
为了在Raspberry Pi上编写qBittorrent软件的这项服务,使用nano文本编辑器。
sudo nano /etc/systemd/system/qbittorrent.service
[Unit]
Description=qBittorrent
After=network.target

[Service]
Type=forking
User=qbittorrent
Group=qbittorrent
UMask=002
ExecStart=/usr/bin/qbittorrent-nox -d --webui-port=8080
Restart=on-failure

[Install]
WantedBy=multi-user.target
- 使用”–webui-port “参数来传递希望Web UI的端口。
启动新创建的qBittorrent服务
sudo systemctl start qbittorrent
验证qBittorrent现在是否在Raspberry Pi上运行。
sudo systemctl status qbittorrent
如果 torrent 客户端按计划运行,应该会看到此命令中出现以下文本。
Active: active (running)
在Raspberry Pi启动时启动。
sudo systemctl enable qbittorrent
jackett插件安装
https://ghproxy.com/https://raw.githubusercontent.com/qbittorrent/search-plugins/master/nova3/engines/jackett.py
配置目录
/home/qbittorrent/.local/share/data/qBittorrent/nova3/engines
ipv6 cloudflare ddns
curl -s -X GET "https://api.cloudflare.com/client/v4/zones/<刚才获取的 Zone ID>/dns_records?type=AAAA&name=<DDNS 域名>&content=127.0.0.1&page=1&per_page=100&order=type&direction=desc&match=any" \
    -H "X-Auth-Email: <Cloudflare 账号的邮箱地址>" \
    -H "X-Auth-Key: <刚才获取的 API Key>" \
    -H "Content-Type: application/json" \
    | python -m json.tool
#!/bin/bash

IP6=$(ip -6 addr show dev eth0 | grep global | awk '{print $2}' | awk -F "/" '{print $1}' | awk 'length < shortest || shortest == 0 {shortest = length; shortest_line = $0} END {print shortest_line}')
echo $IP6
API_KEY=""
ZONE_ID=""
RECORD_ID=""
RECORD_NAME=""
EMAIL=""
curl -X PUT "https://api.cloudflare.com/client/v4/zones/$ZONE_ID/dns_records/$RECORD_ID" \
     -H "X-Auth-Key: $API_KEY" \
     -H "X-Auth-Email: $EMAIL" \
     -H "Content-Type: application/json" \
     --data "{\"type\":\"AAAA\",\"name\":\"$RECORD_NAME\",\"content\":\"$IP6\",\"ttl\":120,\"proxied\":false}"
定时执行
crontab -e
* * * * * /etc/ipv6-ddns.sh > /dev/null 2>&1
BATOCERA
wifi配置文件
wifi.enabled=1
wifi.ssid=wifi1-name
wifi.key=********
wifi2.ssid=wifi2-name
wifi2.key=********
wifi3.ssid=wifi1-name
wifi3.key=********
修正时区 和 开启samba、ssh
进入/userdata/system/batocera.cfg 修改时区和界面语言
system.timezone=Asia/Shanghai
system.language=zh_CN
# 顺便关闭更新提示,开启samba共享和SSH
updates.enabled=0
system.samba.enabled=1
system.ssh.enabled=1
去掉#就是生效。batocera-save-overlay,保存overlay
默认键盘映射
键盘按键对应:
 Z键:手柄B键
 X键:手柄A键
 A键:手柄Y键
 S键:手柄X键
 Q键:手柄L键
 W键:手柄R键
 右Shift键:手柄Select键
 Enter键:手柄SATA键
手柄按键对应:
 方向按键:键盘上下左右按键
 F1键:资源管理器
 PRINT键:屏幕截图
 空格键:系统菜单
 回退键:选项菜单
 ENTER键:确认键
 ESC键:取消或返回
修改键位
以下按键的修改对应端口1的配置。
如果需要修改其他端口,只需将player1改为player2这样就是第二个端口输入了,右侧双引号中的文本为自定义按键的键代码。
配置文件路径userdata/system/batocera.conf
global.retroarch.input_player1_y="j"
global.retroarch.input_player1_x="k"
global.retroarch.input_player1_l="l"
global.retroarch.input_player1_b="u"
global.retroarch.input_player1_a="i"
global.retroarch.input_player1_r="o"
global.retroarch.input_player1_select="space"
global.retroarch.input_player1_start="enter"
global.retroarch.input_player1_up="w"
global.retroarch.input_player1_right="d"
global.retroarch.input_player1_down="s"
global.retroarch.input_player1_left="a"
#如果加上这一句代码,那么当同时按住对应键“l”和“o”时,将呼出retroarch菜单
global.retroarch.input_menu_toggle_gamepad_combo="6"